Thursday, December 30, 2010

Mason Jar & Co.


Here is a piece from my studio in Boston. I painted this one in 2007. At the time I remember thinking that the plums on top of the table made the painting a little dark, so it never made its way to the galleries. Now as I look at it I like the effect, and as it turns out my work doesn't really have the same feel now as it did then. It was nice to look at it and remember.

SOLD


Wednesday, December 29, 2010

Plums & Blueberries


Another 6 x 8. I liked the way the Plums looked against that blue background in the one I did with the almonds. This time I chose bluberries. I did I very loose lay in on the first day and just painted in local color. All the rest of the detail was done on the second sitting after I coated the plums with a layer of oil.
SOLD


Tuesday, December 21, 2010

New MIni: "Clemintines"


Just finished this one! I had to paint the leaves fast since they dry up over night even if I spray them with water. I'm not exactly sure what the berry is but I liked where it was so I put it in.


Sunday, December 19, 2010

Renaissance Randy


This is a portrait of the great Randy. I first met Randy in 2003, my first year as an assistant to Daniel Greene during his summer workshops. Randy is absolutely the most amazing (if not the prettiest) model I have ever worked with. He can hold perfectly still the entire time and almost always gets back into the same pose without needing to be corrected. It's interesting for me because I normally talk to my models while I am painting and expect them to move a bit.
This Renaissance costume is one of my favorite outfits Randy has. The painting took eight 3-hour sittings. It is 24 x 28, Oil on Linen, 2006.


Sunday, December 12, 2010

New Mini - Candy Gathering

Just finished this one. It's not the best photo, I really need a new camera. The title was also a bit of a struggle. I was going for a holiday feel but also wanted the piece to be one that could hang all year round. I'll keep working on it. What's in the cup? I couldn't decide if it was Espresso or a tiny Hot Chocolate.....It' up to you.


Saturday, December 11, 2010

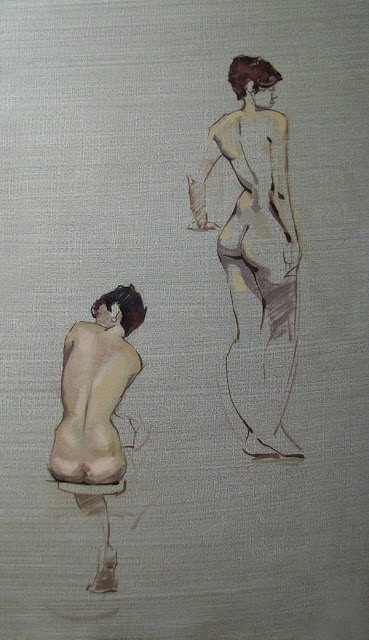
Figure Studies - Short Poses in Oil


Here are a few quick studies from last Sunday's open studio in Florida. The seated front pose was about a half hour. The seated back pose was about 20 minutes and the standing pose was about 25 minutes. These were painted on a 20 x 24 canvas in oils. I usually get between 4 and six figures per canvas.

I used a very limited palette on these:
White, Yellow Ochre, Cad Red Med, Burnt Sienna, Burnt Umber, and Black.


SOLD


Tuesday, December 7, 2010

Breaking Out


A New Minnie titled "Breaking Out". I thought of the cherries as clowns getting out of a circus VW.
SOLD


Sunday, December 5, 2010

Tis The Season II

One of two new Minnies I just finished. If you look closely in the first Christmas Ball there I am behind the Candy Cane.
SOLD


Saturday, November 27, 2010

Plums and Almonds


When I started this I wasn't too happy with it. I wiped it out the first time. The second one came out far better. I don't know why that Tiffany Blue goes so well with purple but I like it.
SOLD


Thursday, November 25, 2010

Tis The Season - A New Mini

Ok, so it's a bit sweet. It's the Holidays and I thought this might be fun to paint. It was - I'm thinging about doing a few more, a series within a series.


Friday, November 19, 2010

Quick Figue Studies/Sketches Nudes


Here are some recent 20min Oil paintings from a local figure drawing open session I have been going to on Sunday mornings. I do the drawing in paint with a brush and work in a very limited palette. White, Yellow Ochre, Cad Red, Burnt Sienna, Burnt Umber, Cobalt Blue and Black.


Wednesday, November 17, 2010

"White Pumpkin and Walnuts"


The Latest Mini - so far, one of my favorites. #27 in the series. I've been doing one a day roughly.


Tuesday, November 2, 2010

St. Augustine Figure Painting


Last night I went to an open figure drawing session in St. Augustine, a beautiful town on the coast of Florida. We started with five 3-minute gestures and then a long pose. I only had a huge 18 x 36 inch canvas with me. My plan was to do a couple of small paintings on it. The pose the model took just happened to be perfect for the whole thing. I started my drawing the way I usually do. The first drawing took about an hour. Then I went to a darker color and re-drew the areas which needed weight. Then a few of the bright lights. The spotlight was behind the model which is why there is such a sharp bright light along the edge.

 Unfortunately, the model thought that the break time was equal to the posing time. Felt like 15 on and 15 off, and the gesture drawings ate up 15 minutes at the begining. With twenty minutes left I had only a drawing and the lights down. I knew I wouldn't be able to finish the figure in that amount of time and I liked the drawing as it was. I decided to paint as much of the background as I could and surround the figure in whatever time was left.
The above is the end result. I say it is about an hour and a half to two hours of actual painting time. It was quick and rushed and fun and i'm pretty happy with the way it turned out.

Tuesday, October 12, 2010

More Minnies


SOLD


I've been busy! Having so much fun painting these. The "Sweet Peppers" above is number 18. Not sure how many I plan to do yet. The response has been fantastic, ten have already gone to the galleries.........


Sunday, October 3, 2010

The Light Side or The Shadow Side?

Whenever painting in a group environment most people rush to the center of the room like they are on line at the deli counter and a prize awaits them in the middle. I take a number and get out of the way and use the same line of thinking when painting with others. I've already seen artists with their backs up against the far wall of a classroom and yet the sides and profile positions are empty. Take a number, get out of the way.... and so I choose the sides or the profile positions. (I like the corners in restaurants too, I can see more of whats going on.)
Now the choice is which side. Usually, if the monitor of the open studio has a half a brain (don't assume they do) the model will be looking forward and the light will be off slightly to one side. Why? So that everyone in the room gets at least a profile. If the model is looking to her left or right then everyone on the other side will be painting the back of the models head. And as for clever lighting arrangements, and difficult drapery backgrounds........If there were a different model each week, but you set them up in the same pose with the same background, most of the artists in the room would still struggle. Painting from life is hard enough....I don't need to make it harder...But back to the point.

Based on that lighting set up there should be a light side and a dark side. I choose whichever is most interesting to me that day.


The painting above is a typical example of the shadow side. This is a two hour study done in Raw Umber and Foundation Umber which is a creamy off-white. When working on the shadow side I quickly try to mass in the darks and then go after the "bands or strips of value" trying not to blend. It is a great exercise to place the right values in the right places in one or two strokes. I place the deepest darks first and then slowly work my way up to the lightest lights.

This painting of Alex was painted from the light side. When working on the light side you usually see more color and less value. I like to paint these with almost the same approach. I still start with the deepest dark and work my way up, but now I have to concentrate on the different colors I see. I try to use color without overstating it. "A touch of purple", a greenish color, a hint of red in the cheeks". I try to avoid bold colors out of the tube because I don't usually see them on a persons face. (Actually I did see it once when a student of mine fell asleep on his palette and didn't realize it.)
This painting above is a mixture of the two. It was painted on the shadow side, in full color. Nothing changes in approach. I still use the "bands of color and value". When I put down the deepest dark first i leave it on my palette. I look for the color one value lighter than what I put down and place it next to it on the palette. If it is lighter on the palette it will be lighter on the painting. I keep doing that using the palette as a guide, testing my strokes on the palette before placing them on the canvas. Of course there may have to be adjustments along the way. Things I missed, errors, etc. I just go back to that area, make the necessary corrections and move on.
The above painting was a three hour study, although I spent too much of that time on the hat. I titled it "Green Hat" for obvious reasons. Yes, when I was very young I had a stuffed bear named......."Bear"... sue me.

"Sepia Study" 16 x 20 Oil on Canvas 2008
"Alex" 16 x 20 Oil on Canvas 2009
"Green Hat" 20 x 24 Oil on Canvas 2007.


Tuesday, September 28, 2010

"Mini Stills" 6 hour Still-Life Studies

I've been working on a new series of "Mini Stills". These are timed at six hours each and then they are done. I work on them in two sittings. Three hours the first sitting, three hours the next day. Because there is no background or reflections like my larger work, I can charge far less for these. All are 6 x 8 Oil on Panel.

I have done 16 so far here are a few.......


Monday, August 16, 2010

Crouching

Hello there,
I received a question on another site asking how I mixed the flesh tones on this piece. I thought I'd post it here.

First I'd like to say there is no secret formula for mixing flesh colors because every person is slightly different. Furthermore each person can be different colors at different times depending on many different circumstances not the least of which is the weather.

That being said I have never met a person I couldn't paint with a simple color palette. So people are different, but basically the same.

The colors I choose are:
Titanium White or Permalba White
Naples Yellow
Cad. Yellow Med.
Yellow Ochre
Raw Sienna
Cad. Red
Alizarin Crimson (optional)
Sap Green (optional)
Burnt Sienna
Burnt Umber
Raw Umber Green Shade (Windsor & Newton) (optional)
Prussian Blue
Cobalt Blue (Optional)
Ivory Black


One of the first things I do is take a look at the model. I then spend a few minutes (about ten) mixing up what are called strings. Strings are pre-mixed colors of paint which are lightened with white in small increments to get seven values of each color. Although the desire may be to jump right into painting, believe me this will save you time in the end. My teacher, Daniel Greene first introduced me to the idea of strings. He, and many other artists, pre-mix their strings before the model arrives, with the same formula every time. Although this is effective for a beginner, I feel that since each person is different, I like to mix different strings each time based on the colors of the model. After a while you will become familiar with how to mix those colors fast, by sight.
Lately I don't mix them at all anymore, I just jump right into painting. 


As for the painting above, I remember using a lot of Raw Umber and White. Most people have very low intensity of color or "chroma" which means there is a lot of grey in their skin color. For this painting I used White, Raw Umber Green Shade, Red and Yellow. I also added Alizarin Crimson for many of the pink areas. I also used Naples Yellow to lighten some of the mixtures.

It was painted in three hours, from life. 20 x 24 Oil on Canvas


Saturday, May 22, 2010

Drawing the Portrait

Hello again folks,
This was a drawing demo I had done for an article in American Artist Magazine. I had also done a full color painting demo which the magazine thought looked more finished. I still think this is a fine example of how I begin each portrait. This was painted from life in one 3-Hour sitting.


I begin with just a few strokes to indicate the placement of the head. I don't ever want it to get too big or too small. This is a gesture drawing, very light, to indicate movement and get a feeling of where things will go.


After I get a general placement I begin to work on the eyes and nose first. I use plenty of plumb lines to check angles. At this point I don't measure. If I need to measure (as in with my thumb on the end of the brush) I do so only to check if there is a mistake. If you begin your work by measuring, you rely to heavily on it and are not training your eyes to see. I feel that getting the diagnal angle from the outside corner of the nose to the outside corner of the eye accurate is on of the most important elements of a portrait.


As I move through the painting my detail gets sharper, my paint gets darker and I try to be increasingly accurate. At this point the drawing does not have to look exactly like the model but it should be close. As the drawing gets covered with paint it may need to be re-drawn several times so there is some room for error....but not too much.

 
I always look at the drawing to be my "map" for the rest of the painting. The more accurate it is, the easier it should be to make the painting and the faster it will go. If the eyes are too low in the beginig drawing at it takes two weeks before you realize it, well that will slow you down a bit.


When I feel the drawing is complete, I add the brightest highlights in pure white. I paint them thinly because I will be going over them later with more paint. I put them in because I feel that it help me gauge the likeness and the feeling of the overall picture. If it feels right now it should feel right later.


Friday, April 16, 2010

The Drawing - Portrait & Still-Life


Each painting I make begins with a drawing. I draw with the brush, directly onto a toned canvas. Most of the time I use a mixture of Burnt Umber and White. I will do several drawings, one over the other, so the first drawing must be done in a value just slightly darker than my canvas. I then make progressively darker drawings until I feel that the drawing is accurate enough to continue.If I know in advance I have several sittings on a portrait, I will stop when the drawing is complete and let the painting dry. If I make a mistake in painting on the second sitting I can simply wipe off the paint and my dry drawing is still underneath.
With a still-life I try to put in as much information as possible. The better the drawing the easier it is to make the painting.

I always add "I've never made a drawing better by filling it in with paint".....It's still my favorite part of the process.